Your camera’s light meter is sophisticated, analyzing scenes with remarkable accuracy—but it’s not infallible. Understanding when and how to override your camera’s exposure decisions separates photographers who occasionally get lucky from those who consistently nail their exposure, regardless of challenging lighting conditions.
This comprehensive guide will teach you exactly when to use exposure compensation, how it works, and why it’s one of the most powerful tools in your photography arsenal—especially for Canadian photographers dealing with extreme lighting scenarios like brilliant snow or dark forests.
What Is Exposure Compensation and Why Does It Matter?
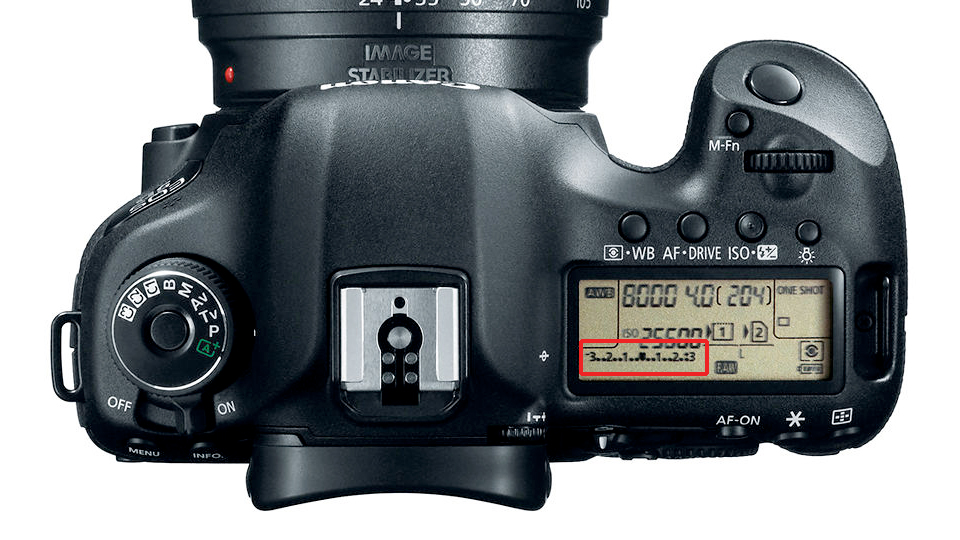
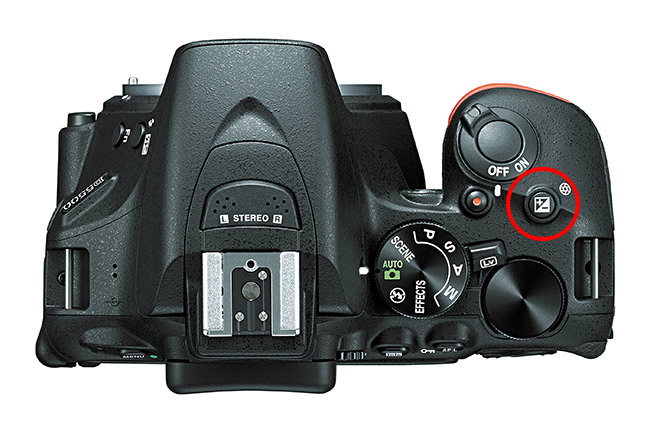
Exposure compensation allows you to tell your camera, “I know what you think is correct exposure, but I want it brighter or darker.” It’s measured in stops, typically ranging from -3 to +3, with each full stop doubling or halving the light.
The fundamental problem: Your camera’s meter is calibrated to expose everything as middle gray (18% reflectance). This works perfectly for average scenes but fails spectacularly with very bright or very dark subjects.
According to Adobe’s exposure fundamentals guide, exposure compensation is essential because “cameras don’t understand creative intent—they only understand averages.”
When Your Camera Gets It Wrong
Your meter will underexpose:
- Snow scenes (makes white snow gray)
- Beach photography (bright sand confuses the meter)
- White or light-colored subjects
- Backlit subjects (exposes for bright background, silhouetting foreground)
- High-key scenes (intentionally bright and airy)
Your meter will overexpose:
- Dark subjects or backgrounds (tries to brighten them to gray)
- Low-key scenes (intentionally dark and moody)
- Spotlit subjects in dark rooms
- Night photography with small light sources
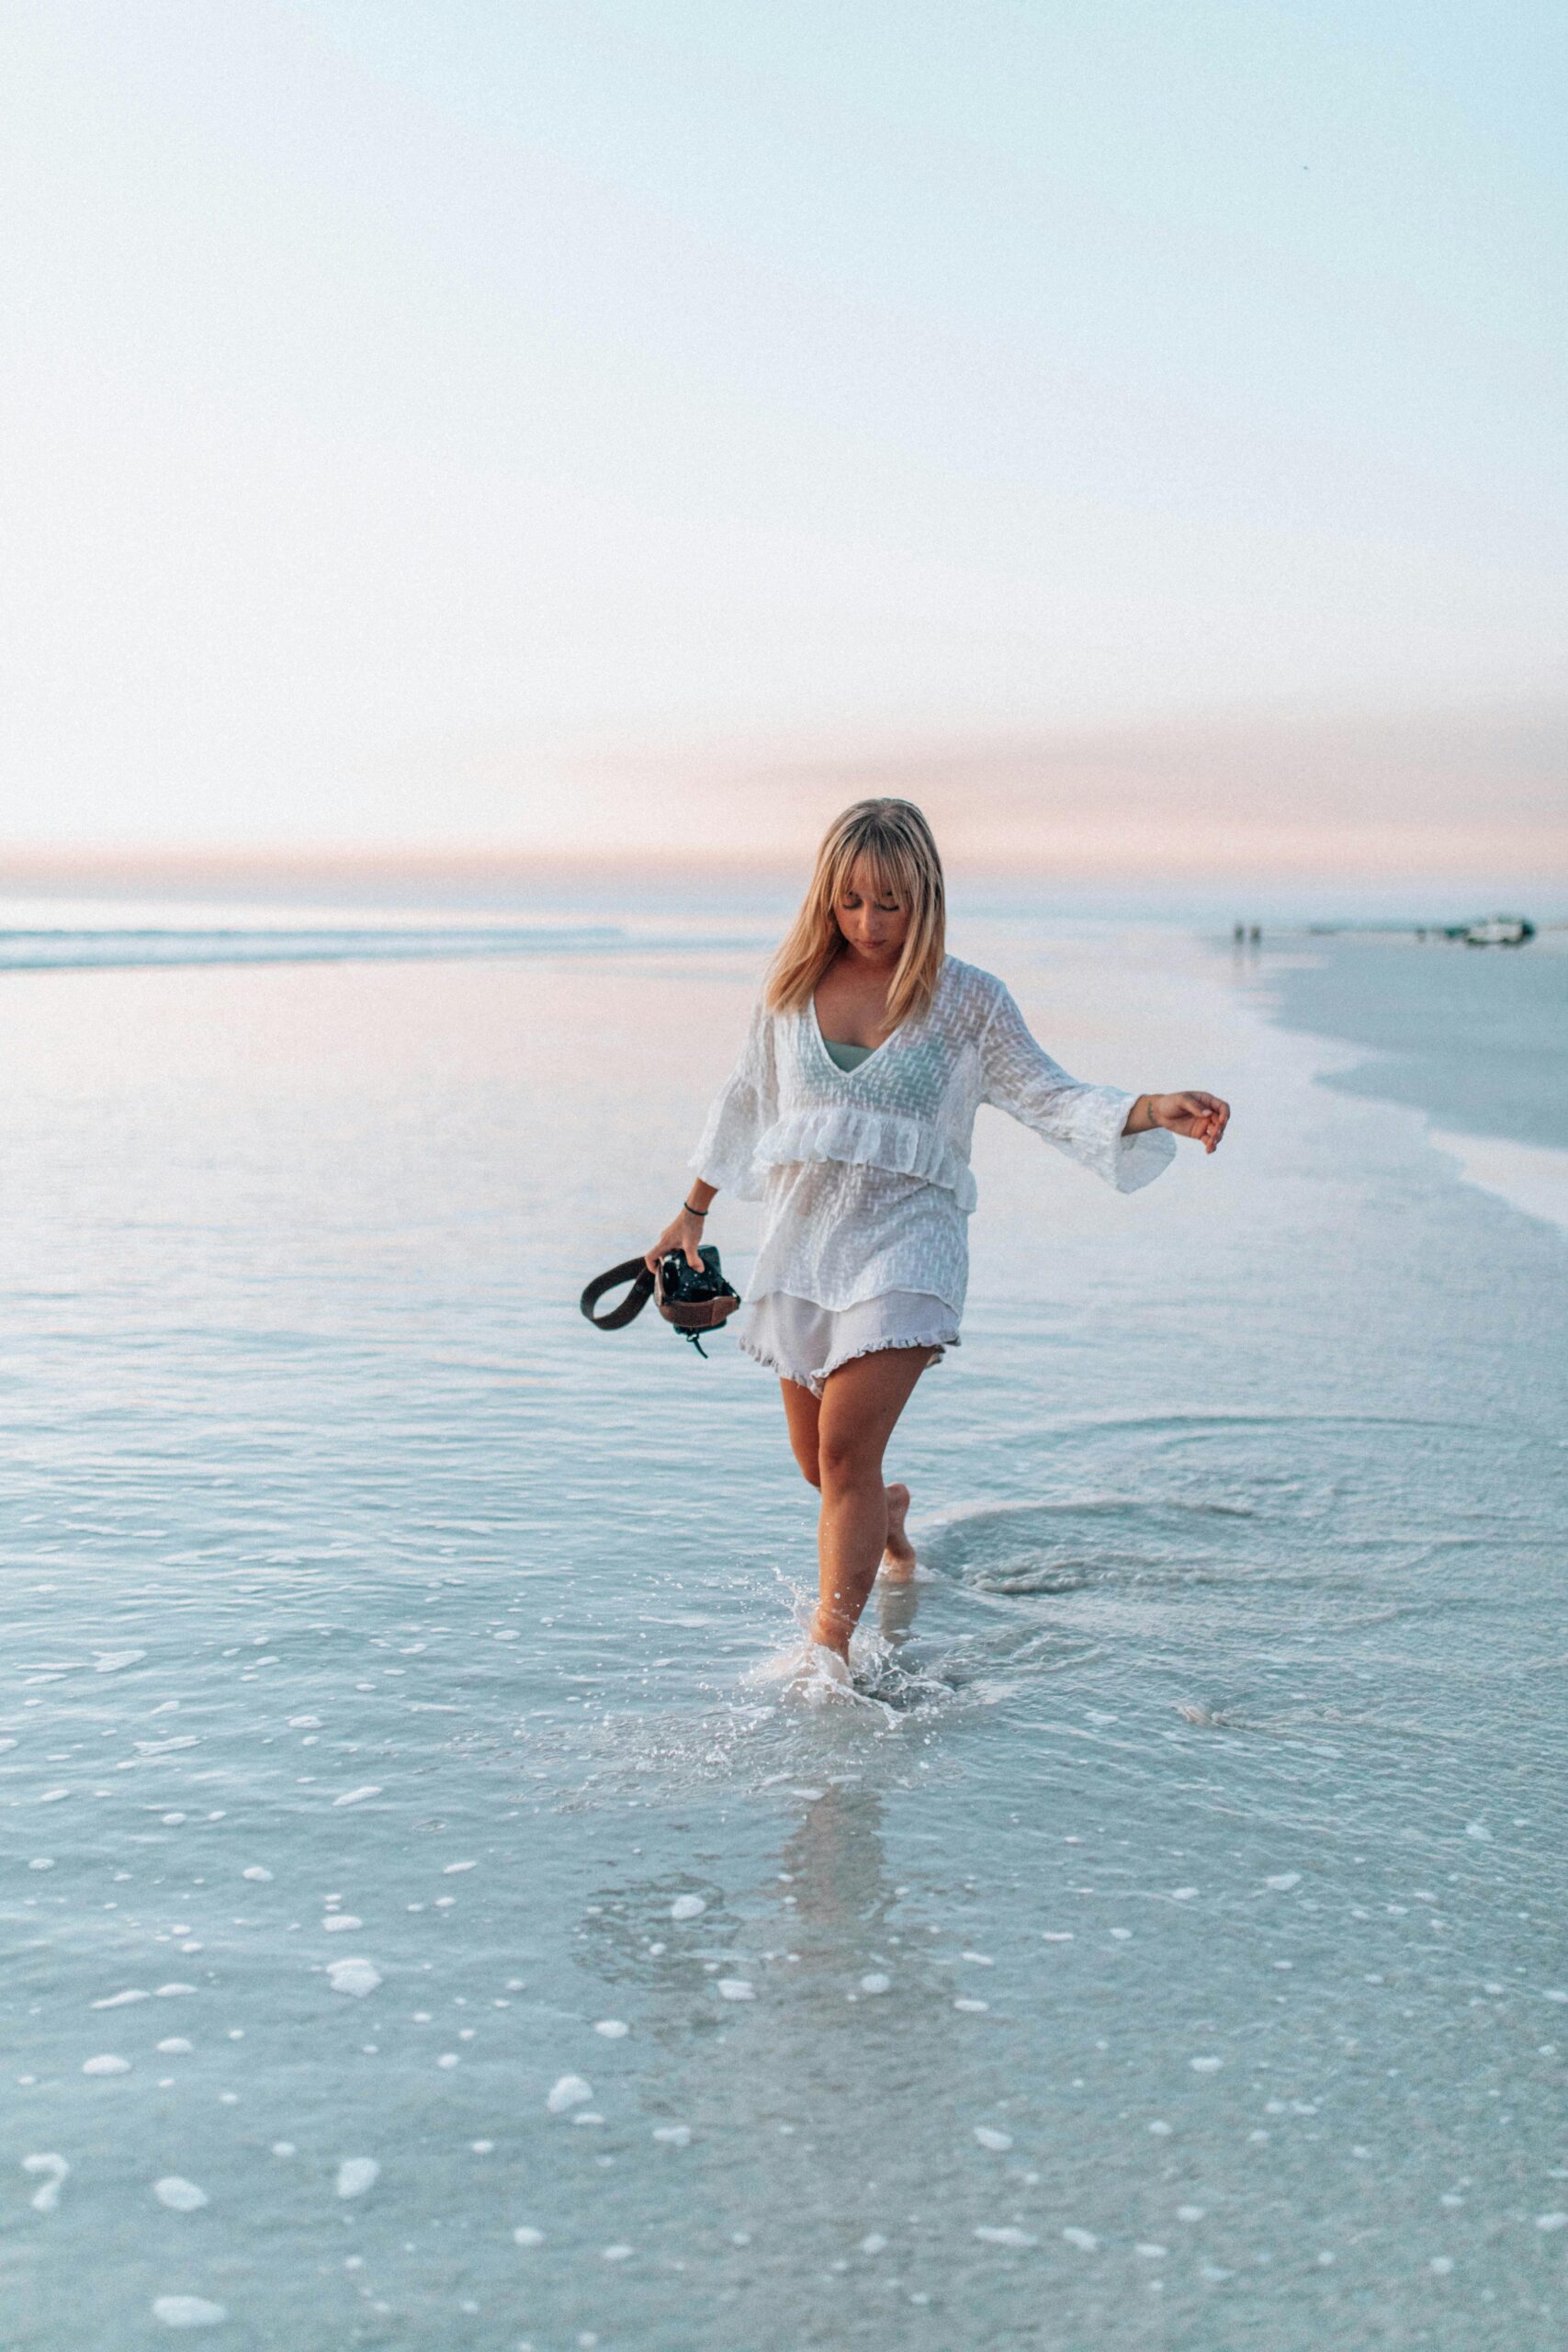
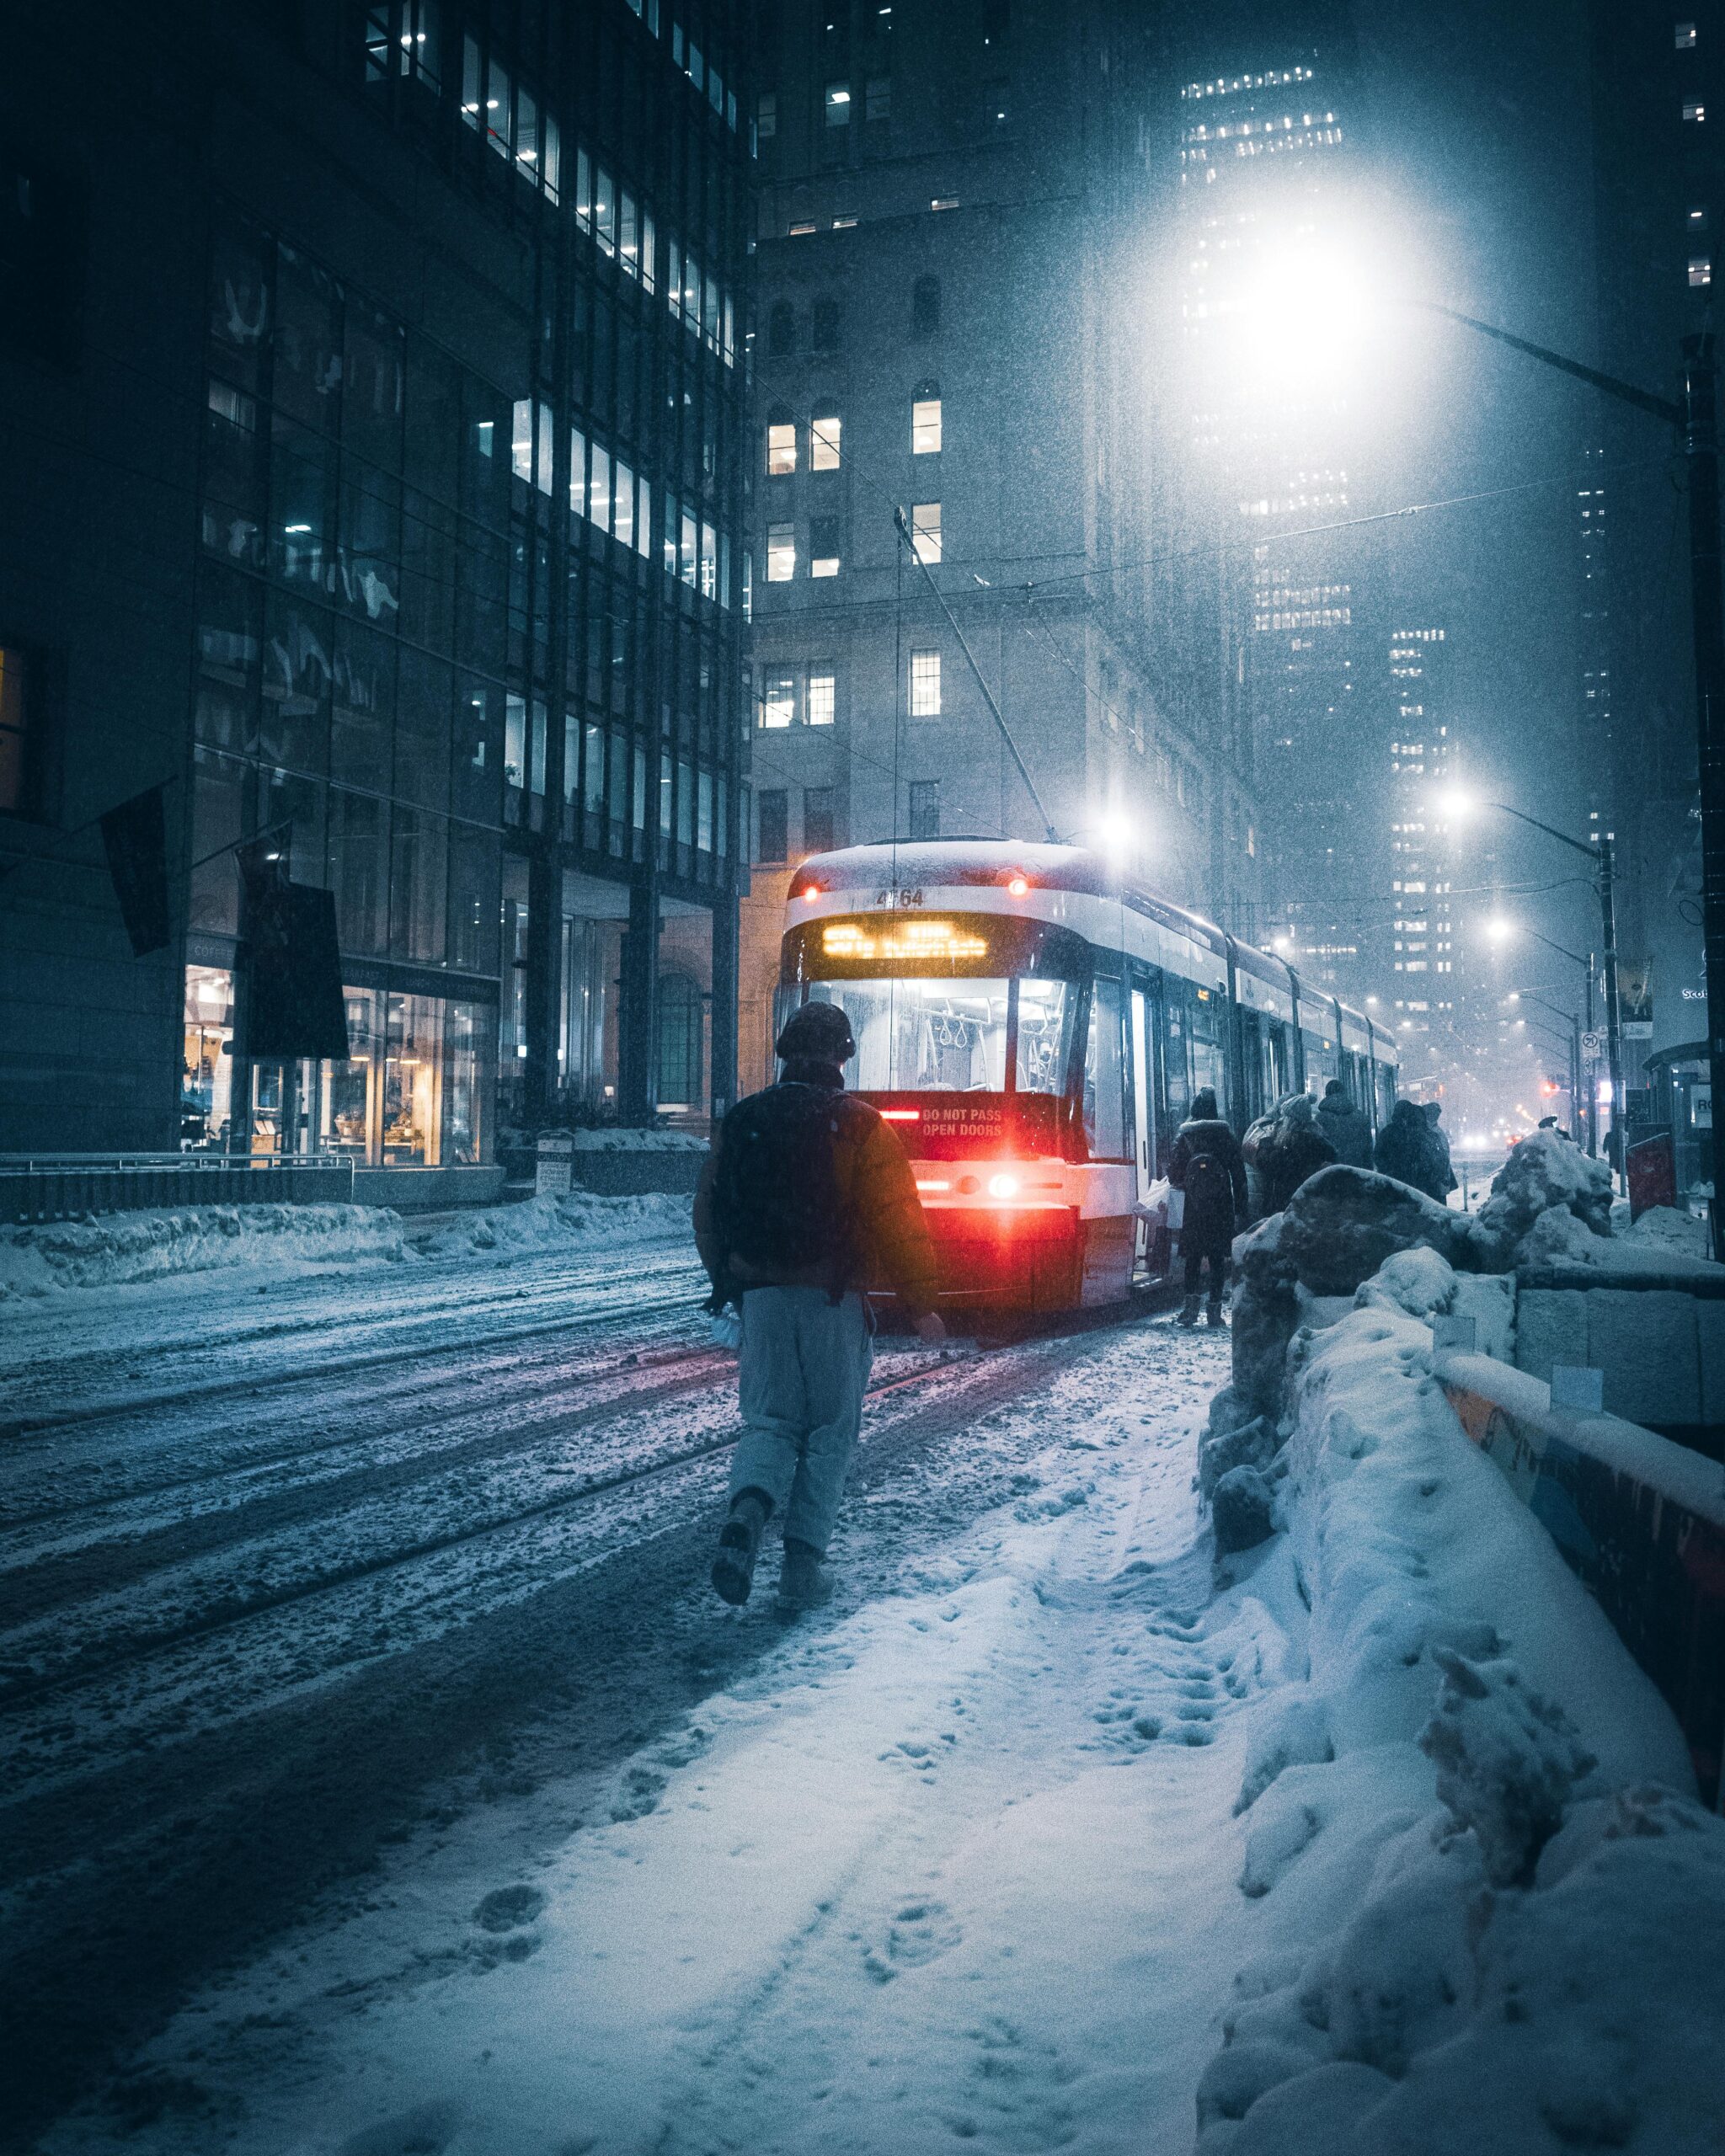
Canadian Winter Example: When photographing fresh snow in Whistler, your camera sees all that brilliant white and thinks “too much light!” It darkens the exposure, turning pristine white snow into disappointing gray. You need to add +1 to +2 stops of exposure compensation to restore the snow’s true brightness.
How Exposure Compensation Works in Different Modes
Exposure compensation behaves differently depending on your shooting mode:

In Aperture Priority (Av/A)
- You set: Aperture and exposure compensation
- Camera adjusts: Shutter speed
- ISO: Fixed (unless Auto ISO is enabled)
This is ideal when depth of field is your priority but lighting is tricky.
In Shutter Priority (Tv/S)
- You set: Shutter speed and exposure compensation
- Camera adjusts: Aperture
- ISO: Fixed (unless Auto ISO is enabled)
Perfect for action photography when you need specific motion control.
In Program Mode (P)
- Camera chooses both aperture and shutter speed
- You adjust overall brightness with exposure compensation
- Useful for quick shooting when light changes rapidly
In Manual Mode?
Exposure compensation doesn’t work in full manual mode—you’re already in complete control. However, if you’re using Auto ISO in manual mode, exposure compensation will shift the ISO the camera selects.
Canon’s official documentation emphasizes understanding these mode-specific behaviors is crucial for maintaining creative control while letting the camera handle appropriate variables.
Reading Your Camera’s Histogram: The Ultimate Truth
Your camera’s LCD screen is a liar. Brightness varies wildly depending on ambient light—an image looks perfect indoors but blown out when you check it outside. The histogram never lies.
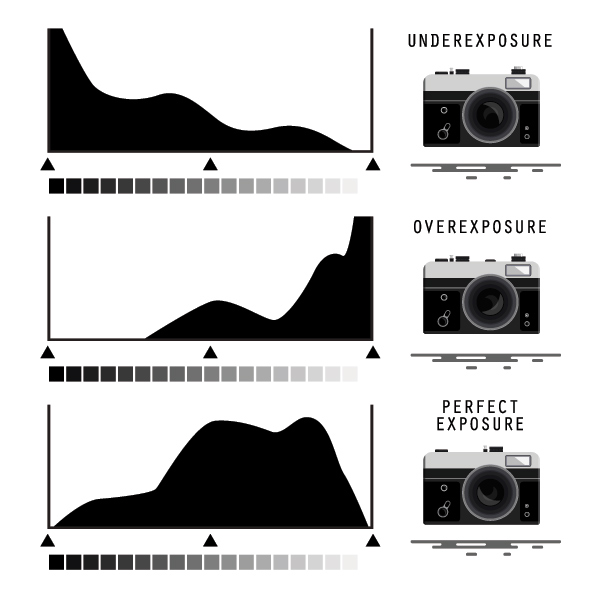
Understanding the Histogram
The histogram is a graph showing tonal distribution:
- Left side: Shadows and blacks
- Middle: Midtones
- Right side: Highlights and whites
A “good” histogram isn’t centered—it matches your creative intent. A sunset should have peaks on the right (bright sky). A low-key portrait should cluster left (dark tones).
Critical rule: Avoid “clipping”—when the histogram bunches against either edge. Clipped highlights mean pure white with zero detail (unrecoverable). Clipped shadows mean pure black (sometimes recoverable in RAW).
The Histogram Test for Snow
After shooting snow, check your histogram. Is there a spike on the right side (bright tones) where snow should be? Good. Is the histogram centered with no spike near the right? Your snow is gray—add exposure compensation.

Practical Scenarios: When to Adjust Exposure Compensation
Scenario 1: Winter Wonderland Photography
The Problem: Photographing cross-country skiing in Gatineau Park. Everything’s covered in snow, and your images look dingy and gray despite perfect weather.
The Solution: +1.3 to +2 stops exposure compensation
Why: The meter sees overwhelming brightness and undercompensates. Fresh snow should be nearly white (but not pure white—it has subtle tone and texture).
Settings: Aperture Priority, f/8 for sharpness, +1.7 exposure compensation, check histogram to ensure spike near right edge without clipping.
Scenario 2: Backlit Subject
The Problem: Photographing your subject against a sunset in Victoria. The camera exposes for the bright background, turning your subject into a silhouette.
The Solution: +1 to +2 stops exposure compensation (or use spot metering on subject)
Why: The bright background dominates the meter reading. Adding exposure compensation properly exposes your subject, even if it slightly overexposes the background.
Pro tip: For true silhouettes, do the opposite—use -1 to -1.5 stops to ensure the subject is pure black against the bright sky.
Scenario 3: Dark Forest Interior
The Problem: Shooting old-growth forest in Cathedral Grove. The camera brightens the scene, making it look artificial and noisy.
The Solution: -0.7 to -1.3 stops exposure compensation
Why: Dark forests should feel dark and moody. Your camera tries to brighten them to medium gray, losing the atmospheric quality and adding unnecessary noise.
Scenario 4: White Subject on White Background
The Problem: Product photography of white jewelry on white backdrop. The camera makes everything gray.
The Solution: +1.5 to +2 stops exposure compensation
Why: Stacking bright elements compounds the metering problem. According to Digital Photography School’s metering guide, scenes with predominantly light tones need aggressive positive compensation.
Scenario 5: Concert or Theatre Photography
The Problem: Shooting a performance in Toronto. The spotlit performer is overexposed while the dark background looks perfect.
The Solution: -0.5 to -1.5 stops exposure compensation, or switch to spot metering
Why: Stage lighting creates extreme contrast. The bright performer is a small part of the frame, but the dark surroundings pull the meter down, overexposing your subject.
Understanding Your Camera’s Metering Modes
Exposure compensation works in conjunction with metering modes. Each mode analyzes the scene differently:
Evaluative/Matrix Metering (Default)
- Analyzes entire frame in zones
- Sophisticated algorithms detect common scenarios
- Works well for average scenes
- Struggles with unusual lighting
Center-Weighted Metering
- Prioritizes center of frame
- Useful for portraits
- Ignores bright/dark edges
- Classic approach for predictable results
Spot Metering
- Measures only 1-5% of frame (center point)
- Pinpoint accuracy for specific areas
- Requires understanding of zone system
- Professional’s choice for challenging lighting
Canadian Landscape Tip: When photographing the Rockies with bright sky and dark foreground, use spot metering on the mountains and dial in slight positive compensation. This prevents the bright sky from causing underexposure of your primary subject.
The Zone System Approach
Professional photographers often use Ansel Adams’ zone system thinking—even if they don’t formally practice it. Nikon’s advanced exposure techniques guide explains this concept clearly.
The concept: Middle gray is Zone V. Each zone represents one stop of light:
- Zone 0: Pure black
- Zone V: Middle gray (what your meter aims for)
- Zone X: Pure white
When you meter a dark rock, your camera wants to make it Zone V (gray). If you want it to look like a dark rock (Zone III), you need -2 stops compensation.
Conversely, metering white snow, your camera makes it Zone V (gray). To render it as bright snow (Zone VIII), add +3 stops.
This explains why automatic exposure compensation rules exist:
- Dark subjects: -1 to -2 stops
- Medium subjects: 0 compensation
- Bright subjects: +1 to +2 stops
Exposure Compensation with Raw Files
Shooting RAW gives you recovery latitude—about 1-2 stops in shadows, and 0.5-1 stop in highlights. This doesn’t mean exposure doesn’t matter; it means you have safety margin.
Critical principle: Expose to the right (ETTR)—push your histogram as far right as possible without clipping highlights. This maximizes data capture and minimizes noise in shadows.
When using exposure compensation, check your histogram and aim to place highlights just before clipping. You can always darken in post-processing, but you can’t recover blown highlights.
Common Exposure Compensation Mistakes
Mistake 1: Setting and Forgetting
You used +1.7 for snow shots, then moved indoors and forgot to reset. Now all your interior shots are overexposed.
Solution: Develop a habit of checking exposure compensation when changing locations or lighting. Some cameras have a warning indicator when compensation is active.
Mistake 2: Relying Solely on LCD Screen
The screen looks good, so the exposure must be right—wrong. Check your histogram every time.
Mistake 3: Compensating in the Wrong Direction
Snow looks dark, so you darken further with negative compensation—compounding the problem instead of fixing it.
Solution: Understand why your camera errs. Bright scenes need positive compensation; dark scenes need negative.
Mistake 4: Not Bracketing Critical Shots
For important moments, bracket exposure (shoot at -1, 0, +1) to ensure one perfect exposure.
Practical Exercises
Exercise 1: The White Towel Test
Photograph a white towel in good light. Without compensation, it looks gray. Add compensation until the histogram shows white properly (peak near right edge). This calibrates your understanding of how much compensation white subjects need.
Exercise 2: Snow Day Challenge
Spend a day shooting snow exclusively. Experiment with different compensation amounts (+1, +1.3, +1.7, +2). Review on a computer to see which value works best for your camera and editing style.
Exercise 3: Metering Mode Comparison
Photograph the same challenging scene (backlit, snow, dark forest) using all three metering modes with and without compensation. Study the results to understand how different meters read light.
When to Use Exposure Lock Instead
Sometimes exposure compensation isn’t the answer—exposure lock (AE-L button) is. This locks your exposure reading, allowing you to:
- Meter on your subject
- Lock exposure
- Recompose
- Shoot with correct subject exposure
This is particularly useful for backlit portraits where you want to meter directly on the face before recomposing.
Advanced Technique: Shooting for Your Editing Style
As you develop a consistent editing approach, you’ll discover your personal exposure preference. Some photographers intentionally underexpose by 1/3 stop for richer colors and easier highlight recovery. Others prefer slightly overexposing for cleaner shadows.
Your exposure compensation becomes part of your signature style. There’s no universal “correct” exposure—only correct for your vision and workflow.
Take Your Technical Skills to the Next Level
Understanding exposure compensation is crucial, but it’s one piece of the larger photography puzzle. From mastering challenging lighting to developing a consistent editing workflow, professional photography requires comprehensive knowledge across multiple domains.
Our professional photography course covers everything from advanced exposure techniques to building a successful photography business. You’ll learn to handle any lighting situation confidently while developing the artistic vision that makes your work stand out.
The Bottom Line
Your camera’s meter is a tool, not a truth-teller. It makes educated guesses based on averages, but it doesn’t know you want that snow to sparkle brilliant white or that forest to feel mysteriously dark.
Exposure compensation gives you the power to override those guesses and capture your creative vision accurately. With practice, adjusting exposure compensation becomes as automatic as focusing—you’ll instinctively know when to dial in +1.3 for snow or -0.7 for moody interiors.
Master this tool, and you’ll never again accept gray snow, silhouetted subjects, or washed-out dark scenes. Your camera has the capability to capture what you see—you just need to tell it what you want. Now you know how.